


Underfloor heating in your home is becoming increasingly popular in the dad DIY community.
Not only is it stylish and very useful in certain rooms, but it also resolves the severe issue of cold feet.
Learning how to install underfloor heating is an excellent method to deploy in various rooms within your abode.
Table of Contents
We all know how difficult it is to maintain a comfortable temperature in rooms with concrete floors.
I’ve spent a good chunk of my time researching how to install underfloor heating due to laying it in my primary bathroom.
I’ll share the tips, tricks, and knowledge I learned when laying my underfloor heating. You will know the most efficient process for when you start laying yours. Let’s get into it.
Different Types of Underfloor Heating
Two popular types of underfloor heating are used in the day-to-day home. Here is a quick overview of both. It’s important to pick the right type for you and your home.
Hydronic Heating
Hydronic heating systems use hot water from your boiler to heat the floor. The hot water is circulated through water pipes under your flooring. This provides a consistent and efficient heating source.
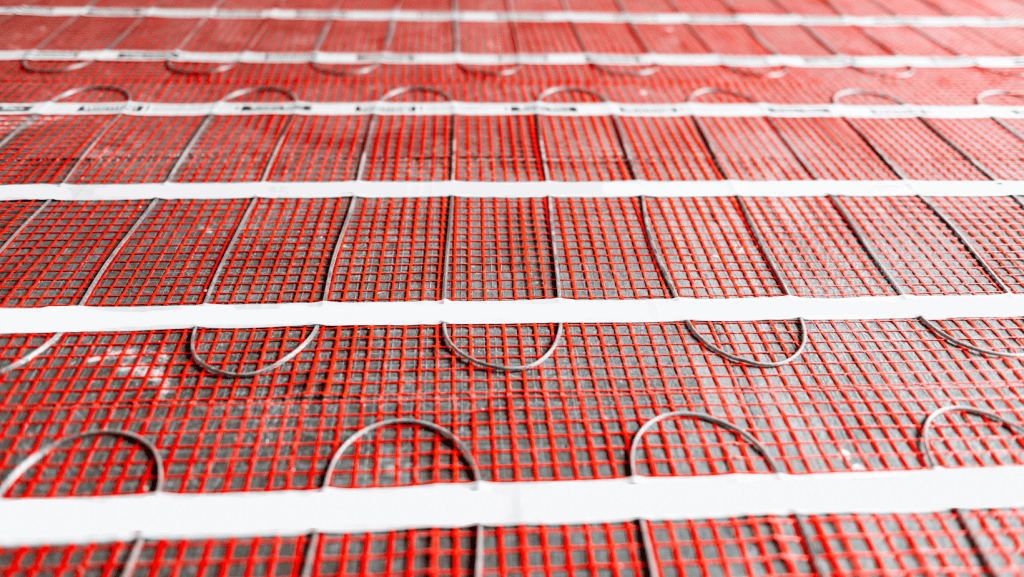
Electric Heating Mats
Electric heating mats consist of coils embedded in mesh mats rolled out on your subfloor. These mats are connected to a thermostat and your mains power supply. This gives a reliable underfloor heating solution.
Both systems have advantages and disadvantages. I chose to lay electric heating mats in my bathroom, and the installation process was extremely straightforward.
Always do your research and pick the best system for your needs.
Tools You Need
Suppose you are a DIY lone wolf or assisting a trained professional. In that case, you will need these essential plumbing tools.
If your underfloor heating is a wet system, you will need the below tools:
- Pipe cutter
- Pipe fixing clips
- Tape measure
- Pipe re-rounding tool
If your underfloor heating is an electric-based system, you will need the tools below:
- Wire cutters/strippers
- Sharp blade
- Screwdriver
- Marker pen
- Electric meter
How To Install Underfloor Heating – Hydronic
Preparing the Subfloor
Before getting started, it’s important to ensure you prepare your concrete subfloor properly. Remove any debris or jagged edges that could damage your heating pipes when laying them.
Thoroughly sweep and vacuum the dry underfloor to ensure it is free of dust or dirt.
Using Insulation
In this day and age, energy efficiency is vital in the everyday home. We highly recommend you use insulation beneath the underfloor heating.
The insulation will help prevent heat loss through the subfloor and your foundations. This will result in increased energy savings in the long term. Result.
Floor Finish Compatibility
Remember to consider the compatibility of the chosen floor finish with your underfloor heating. Certain floor coverings like vinyl, carpet, laminate, and wood have maximum temperature limits.
Using a flexible self-levelling latex or tile adhesive is best if you’re using tiles or ceramic flooring. This will cover the system and create a smooth floor for installing tiles.
Once your subfloor is prepared, you are ready to install the underfloor heating.
Install the Manifold
The manifold connects the underfloor heating pipework to the heat source and should be the first component installed.
Choose a suitable mounting site. Consider the unit’s weight, proximity to the circuit board, and connection to the water pipes. The plumbing arrangement is similar to that of a radiator.
This part requires a skilled and seasoned plumber. They will connect the system to the primary water supply and central heating network. Make sure to have that in mind so you can organise this when finished.

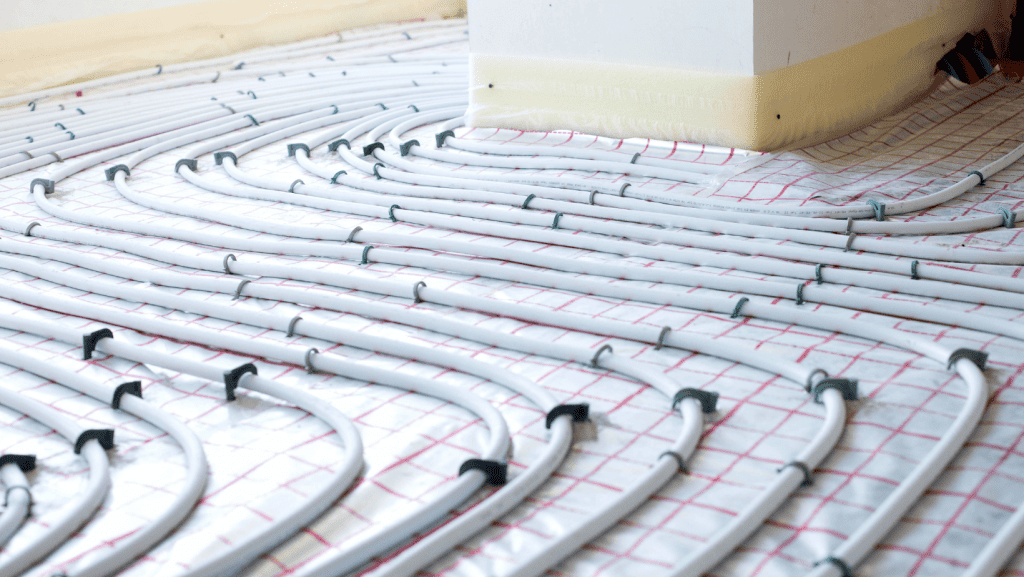
Lay the Heating Pipes
Start laying the heating pipes on the subfloor, ensuring they are positioned at the specified distance apart.
You should use a flexible pipe and looping around the room with an even spread. Use the pipe rounding tool to determine your bends and the pipe cutter to measure your lengths.
The pipe loops should be evenly spaced, generally between 200mm and 250mm. Avoid exceeding the maximum length of pipe for each room, typically around 100-110m. This will give you the optimum spacing for your heat distribution.
Once your pipes are where they need to be, ensure they are fixed to the ground using your pipe-fixing clips. Everything needs to be solid and have as little movement as possible.
Connecting The Heat Source
Once your water pipes have been laid and connected to the manifold, it’s time to connect it all to the heat source.
I stated previously that hiring a qualified plumber is essential. It ensures proper installation and connection.
Test and Test Again
Before cracking open a cold one and congratulating yourself on a well-done job, you must test the heating to ensure it works.
The last thing you want is an underfloor sprinkler, so once connected, turn on your system and pressure test the pipes for durability and warmth. Be careful not to burn yourself while doing this!
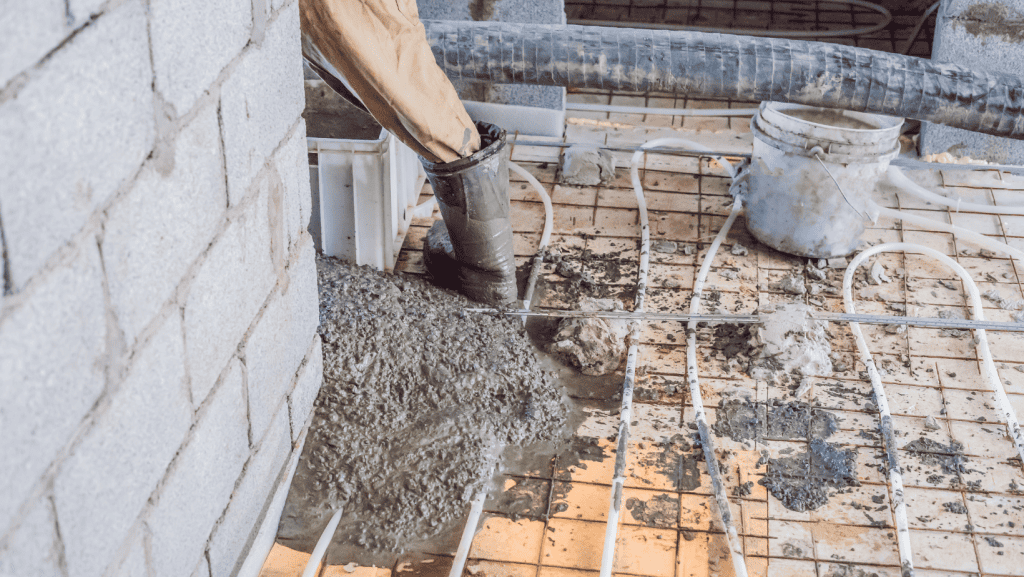
Cover with a Layer of Screed
Now that everything is connected and working, it’s time to return your floor to how it should be. Laying a layer of screed will enhance heat distribution and insulation for your underfloor heating.
Different types of screed are available. For example, semi-dry trowelling screed or fast-flowing liquid screed. Ensure you research the correct type of screed to complete your project.
Once the layer of screed has been chosen, laid and levelled, allow the screed to dry for a minimum of 7 days before activating the underfloor heating.
Initially, set the underfloor heating to the lowest temperature and gradually raise it over several days.
How To Install Underfloor Heating – Electric
Preparing the Subfloor
Before getting started, it’s important to ensure you prepare your concrete subfloor properly. Remove any debris or jagged edges that could damage your electric heating mats when laying them.
Thoroughly sweep and vacuum the dry underfloor to ensure it is free of dust or dirt.
Using Insulation
In this day and age, energy efficiency is vital in the everyday home. We highly recommend you use insulation beneath the underfloor heating.
The insulation will help prevent heat loss through the subfloor and your foundations. This will result in increased energy savings in the long term.
Floor Finish Compatibility
Remember to consider the compatibility of the chosen floor finish with your underfloor heating. Certain floor coverings like vinyl, carpet, laminate, and wood have maximum temperature limits. You must consider these limits.
Suppose you are using tiles or ceramic flooring. In that case, covering the system with a flexible self-levelling latex or tile adhesive is advisable. This will allow a smooth floor for your tile installation.
Once your subfloor is prepared, you are ready to install the underfloor heating.
Test the Mat
Before installing, test your electric heating mat to ensure everything is in working order. You can use a volt-ohm meter to measure the mat’s resistance. This ensures it matches the manufacturer’s specifications.
Below are the basic tests you can carry out to ensure your underfloor heating works as it should.
Heating Mat Test Procedure:
- Remove the mesh heating mat from its packaging.
- Power on your testing meter and configure it to ohms.
- Attach the live wire to one terminal and the neutral wire to another.
- Ensure that the meter reading falls within -5 % to +10% of the expected values provided in the instruction manual.
- Record the part number and readings from the instruction manual for warranty registration.
Insulation Test for the Heating Mat:
- Activate your insulation tester, setting it to 500V.
- Connect the live and neutral wires to one terminal and the earth wire to another.
- Initiate the test and observe the results. The tester should display a reading of more than 999 Megaohms or infinity.
Floor Sensor Resistance Check:
- Configure your meter to ohms and connect the cables to the designated terminals.
- ThermoSphere floor sensors are specified at 10k Ohms at 25°C. Depending on the temperature, the reading should range between 8k and 12k.
- Document the results. Then, repeat the same procedure for the spare floor sensor.
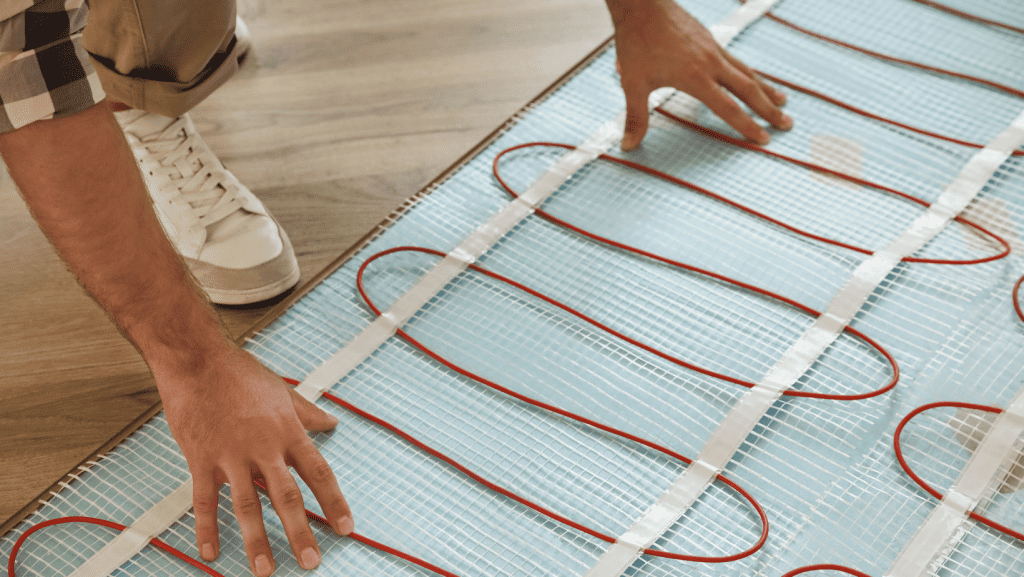
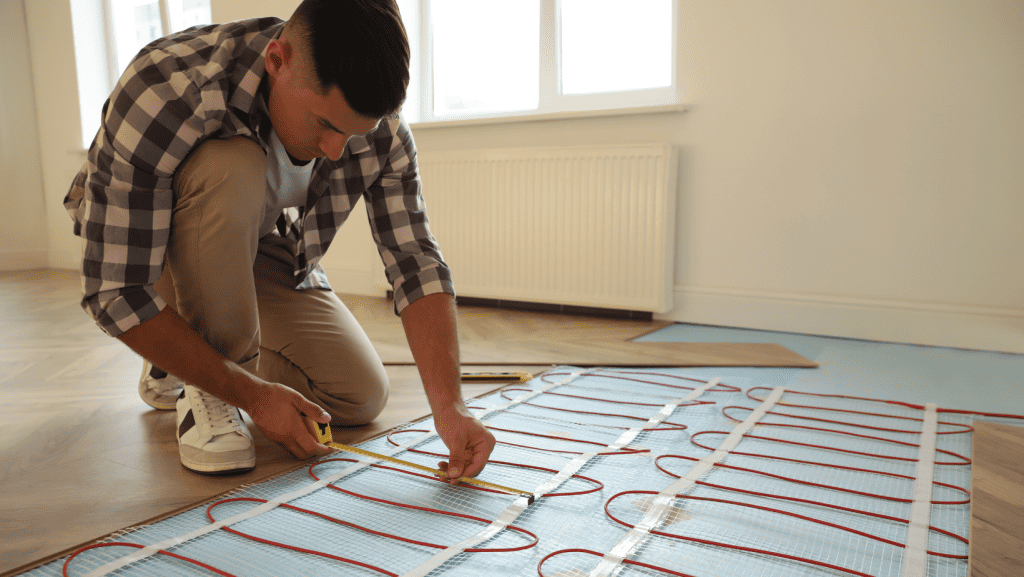
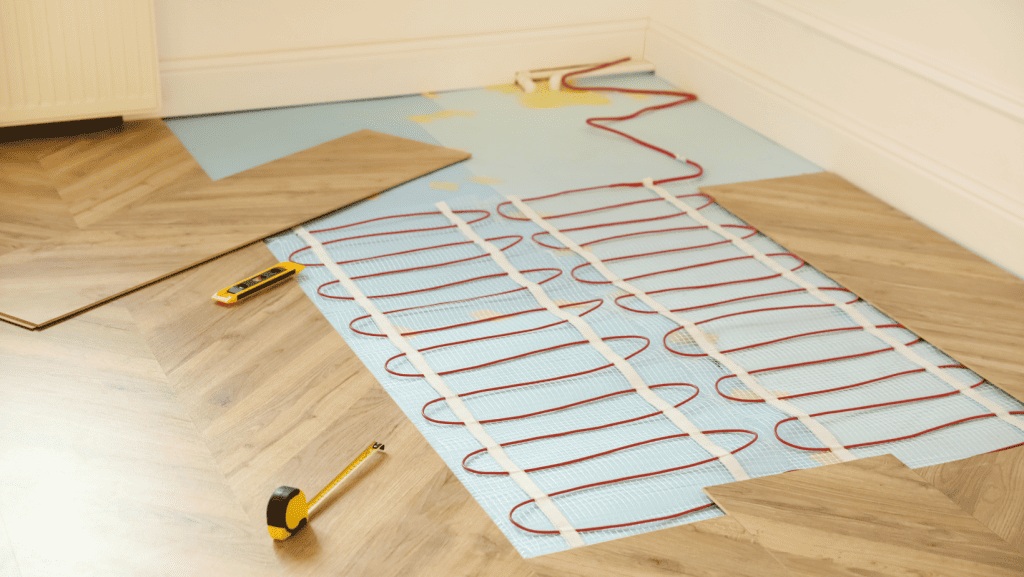
Start Laying the Mat
Now that you are happy with the quality roll out your electric heating mat on the prepared subfloor. Always follow the manufacturer’s guidelines for spacing and positioning. This ensures optimum heat distribution.
Secure the mat to the concrete floor using double-sided tape or adhesive, ensuring it is flat and free from any wrinkles or bumps. Most underfloor heating mats come with attached tape, so peel them off and stick them to the floor.
Some arts and crafts will be involved, and you must trim the mat to size. Make sure to only cut the fibreglass mesh and not the red element.
You can then follow the room’s flow. Roll and fold your heat mat over and line it up as you fill the floor space. Keep the red element intact. Only trim the base mesh layer to size.
You will want to leave a rough 100mil gap around the whole outside edge of your room, between the mat and skirting board. No need to go flush up to the wall.
When lying in a bathroom, you do not need to lay your underfloor heating under any of the items in the room, like under the bath or toilet. Just focus on the open floor space.
You must probe between elements if you’re laying between wooden joists or insulation. Cut notches into the insulation board or joist, so it is flush with the floor.
Wiring and Connections
You should install conduit connectors to guide the power lead and thermostat wires. Keeping loose wires exposed in the floor and walls is not a good look!
You will now need to connect the wiring to your electrical box. We recommend you consult a qualified electrician for this step. This will ensure safety and compliance with electrical regulations.
For peace of mind, you can also get a qualified electrician to test the floor once the connection is in place.
Applying a Level Floor and Chosen Floor Type
Now that your heat mats are down spread a self-levelling compound over your electric heating mat. Ensure it covers the entire surface. Make sure all of the heating cables and terminations are covered.
Once the compound has dried, proceed with the floor installation. Ensure proper alignment and spacing, depending on your floor choice. Remember, check your floor finish capabilities with underfloor heating. You want to avoid putting wooden flooring down and then taking it up again due to heat damage.
That’s it; you’ve learnt how to install underfloor heating, and your feet are ready to be consistently warm!
Seeking Technical Support
If you need help or have questions about your underfloor heating beyond your DIY Dad’s knowledge, always seek help from a professional.
FAQ's
- It provides warm underfoot comfort.
- It distributes heat more evenly than radiators and electric heaters. This reduces hot patches and chilly draughts.
- You can zone the property and control each zone independently.
- The absence of radiators on the walls saves room and allows furniture to be placed wherever pleases.
- It lowers dust circulation, making the air cleaner and less allergic.
- Installation can be pricey and disruptive. This is especially true for retrofitted water underfloor heating.
- Underfloor heating operates at lower temperatures than radiators; thus, it takes longer to heat a room.
- Electric underfloor heating is costly to operate in large areas.
- The flooring options are limited.
Underfloor heating requires a great deal of insulation. It should be installed beneath the heating pipes for the best results, preventing heat from escaping below.
This means that the heat will rise and efficiently warm the room.
Expanded polystyrene (EPS) is a popular and cost-effective recommended substance. It is constructed from polystyrene foam beads. These beads have little air chambers that make EPS 90% air, making them incredibly light. This implies it is entirely safe and relatively effective.
The Bottom Line
I absolutely love the underfloor heating in my bathroom, and I certainly wouldn’t return! After learning how to install underfloor heating, I thought it was cost-effective to heat specific rooms in my home through the floor. I could do it myself without paying a professional.
Whether you choose a hydronic or electric system, it’s important to use insulation, consider the floor finish and test, test, test!
Follow the steps in this guide to enjoy the benefits of underfloor heating. It will create a cosy environment in your home and keep your feet warm on those colder days!
How To Install Underfloor Heating
Thank you for reading our article on How to install underfloor heating. If this has been useful, please check out our blog HERE, for more DIY tips and advice, tailored for Dads maintaining their home.