


We all get to a point when our bathtub or shower trays feel sorry for themselves. Sometimes, they need a bit of a pick-me-up; luckily, a bath repair kit can do that.
After recently refurbishing my bathroom, I kept my old tub. I freshened it up, using the Hupeyna Shower & Bath Chip Repair Kit, repairing its chips and smoothing over some other minor damage.
I went on to test the five bath repair kits below, judging the ease of the application process, drying durations, adaptability to various tub materials, and overall efficacy.
These five-chip repair kits represent the top-notch tub repair kits currently available.
The Most Proficient Bath Repair Kits At A Glance
The Top 5 Bath Repair Kits For Chip and Scratch Repair
- Two small wooden mixing sticks.
- Plastic gloves.
- A plastic spatula.
- A small mixing surface.
- Two toothpicks for adding colour.
- Stickers to contain the repair area if needed.
- Application - 9/10
- Drying Time - 8/10
- Adaptability - 8/10
- Materials - 9/10
- Dad Satisfaction - 10/10
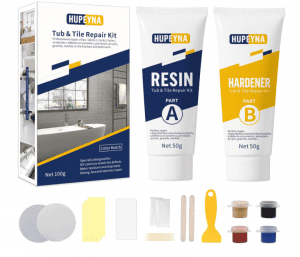
The Hupeyna Kit consists of two parts that require equal mixing. It has a white base and small pots of colour are included to match with other colours.
The package also provides two grades of sandpaper for the finishing process after it has dried.
Once dry, the material hardens nicely, and you can paint over it if necessary. While the consistency is somewhat runny, it is most straightforward to apply on a flat surface.
However, applying it on vertical surfaces is not impossible, as you can build it up.
I also used this bath repair kit to fix small chips and flaws in the bottom of our kitchen cupboard doors.
It’s waterproof, making it suitable for the kitchen, not just a bath repair kit!
The small pots of colour were good, allowing for a close match to the surface.
The colour options in this kit include brown, black, red, and blue, with other versions available according to the instructions.
A strong experience using this kit and recommend it as an excellent go-to.
The package provides:
- Two sticks.
- Masking stickers.
- Mixing plate.
- Smoothing paddle
However, additional sticks may be required if you’re looking for multiple uses.
- Application - 8/10
- Drying Time - 9/10
- Adaptability - 8/10
- Materials - 8/10
- Dad Satisfaction - 9/10
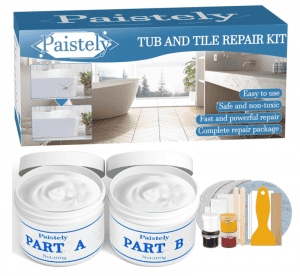
Onto the Paistely Bath Repair Kit. It includes ample quantities (100 grams each) of resin “A” and hardener “B,” along with four small containers of liquid colourants, which prove to be great.
Combining resin and hardener results in a well-mixed, smooth, uniformly coloured semi-paste. The mixed resin independently solidifies with time, as outlined in the instructions.
Use the colouring sparingly. I found excessive colourant led to the creation of a “cured” resin that was either soft or failed to cure altogether. I confirmed this in my testing, achieving a rubber-like cure when only adding about 10% colourant in a sample.
I faced challenges achieving the lighter colour shade I needed while achieving a proper cure with this kit’s components.
For darker applications, the kit will perform well. I found mixing a small test sample and keeping track of my ratios helpful.
- Plastic Gloves.
- Masking Tape
- Sandpapers
- Spatulas
- Mixing Board
- Scraper
- Application - 8/10
- Drying Time - 7/10
- Adaptability - 9/10
- Materials - 8/10
- Dad Satisfaction - 8/10
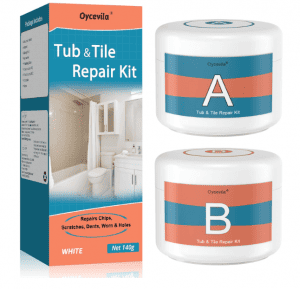
In the Oycevila Kit, there are two containers; one for resin and one for catalyst. The two are then mixed together.
To help in this along, there’s a mixing palette and two spatulas in the pack. It also includes a scraper, masking tape, two grades of sandpaper, and protective gloves, which are about average. Your instructions follow.
The repair paste was easy to mix and okay to apply. It is thick but stiffer than some epoxy products I have used. Its self-levels don’t have a strong odour and are described as non-toxic.
The provided spatulas worked well, too. Once your repair has hardened, you can sand it down to give a glassy finish, and once fully dry after 24 hours, the repair is waterproof.
This kit can be used in various situations, such as in your bathroom. However, one caveat is that the mix seems runny, and this helps level it on a flattish surface, e.g., a cracked sink.
It, however, is more challenging to work on a vertical surface. It’s not impossible, but it may be a case of two passes and returning initially to deal with any slippage.
Dry time was around three to four hours. The fully cured surface is glossy, as is the finish of most bathroom surfaces, so it matches well.
- Disposable gloves,
- Spatula
- Wooden stirring rods
- Stickers
- Stirring plate
- Sandpapers
- Application - 9/10
- Drying Time - 8/10
- Adaptability - 9/10
- Materials - 7/10
- Dad Satisfaction - 8/10
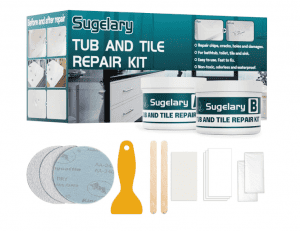
The Sugemur Kit was incredibly user-friendly and was one of the easiest ones I have tested. An ample amount was in the pack, and a small quantity went a long way.
It comprises components A and B, disposable gloves, a spatula, wooden stirring rods, stickers, a stirring plate, and sandpapers.
After the application, I had some mixture left over; I managed to utilise the remainder to address limescale stains around the plug hole that proved tricky to remove.
The repair on the cracked bath yielded a pleasing result from a looks perspective. Additionally, I applied the mixture to degraded grout around the tile, achieving another good outcome.
The matte finish of the mixture gives a toothpaste-like appearance on the enamel surfaces. It’s unrealistic to expect one mixture to perfectly match different surface types with their inherent variations in shade.
Despite this, I am very pleased with how the repairs turned out with this kit.
- Scraper
- Sticker
- Sandpaper
- Mixing plate
- Plastic gloves
- Wooden mixing rod
- Toothpick
- White colour paste
- Black colour paste
- Application - 7/10
- Drying Time - 8/10
- Adaptability - 7/10
- Materials - 7/10
- Dad Satisfaction - 7/10
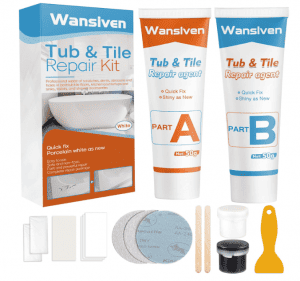
Contained within a surprisingly compact box, the Wansiven Repair Kit provides everything you need for those basic repairs.
However, if your aim is more of a high-quality finish rather than a patch-up. In that case, you might require additional items beyond what’s included.
I found the enclosed instructions minimal. The helpful info is limited to what’s written on the tube.
Although the kit includes white and black paint, you might need other colours to match your surface accurately, so it is best to check the correct colour. Take time to achieve a close colour match for a less noticeable repair finish.
The kit provides 3 pieces of sandpaper with varying grits. I started with the rougher paper, like 400 grit, and progressed to 600, 800, and finer grits, such as 1000 or 1500, for the final finish on the bath enamel surface.
It wasn’t the easiest to use, and mixing it to the correct consistency took a lot of work. There are better kits for large holes, but it works well, covering small holes and repairing chips.
This is perfect for small areas and repairs; it has a nice, bright, white-looking finish once dried. It helped clean up the look of my old knackered bath.
FAQ's
Absolutely! Bath repair kits are intended to successfully repair various difficulties, such as cracks, chips, or scratches in your bathtub. The key is to carefully follow the instructions and ensure the correct application for the best results.
The durability of a bath repair is determined by factors such as the type of repair kit used, the level of damage, and the quality of the repair. A professionally done bath repair can last long, making it a less expensive option than replacing the entire bathtub.
The cost of bath repair can vary based on the severity of the damage and the type of repair kit chosen. On average, DIY bath repair kits are budget-friendly, while professional services may incur higher costs. Assess the damage, consider your budget, and choose the best option that suits your needs.
Bathtub cracks are widespread and can occur for various reasons, including temperature changes, impact, or the age of the bathtub. Fortunately, with the correct bath repair kit, these cracks may be effectively repaired, restoring your bathtub’s beauty and usefulness.
Yes, many bath repair kits are adaptable. They may be used on various materials, including acrylic, fibreglass, porcelain, and enamel. For the best results, ensure that the product specs are compatible with the material of your bathtub.
While specific DIY skills are helpful, most bath chip repair kits include user-friendly instructions, making them suitable for beginners. Take your time, follow the step-by-step instructions, and you’ll most likely complete the repair without expert assistance.
If your bathtub has numerous issues, prioritise the repairs according to severity. Begin with the most serious issues, tackling one at a time with the right bath repair equipment. You should seek professional aid if you need help handling several repairs or if the damage is substantial.
5 Proficient Bath Repair Kits To Save You Money
Thanks for reading our article on 5 Proficient Bath Repair Kits To Save You Money. Please go check out our blog HERE for more advice for those handy dads out there.